Monday, February 15, 2016

Organizing that endless to-do list: 10 TRICKS to use on an Apple to make your life easier

If you're like me, you are constantly making mile long to-do lists- usually multiple that you tend to lose track of and often re-write. I have found Apple's "Reminders" and "Notes" apps that come standard on all Mac and iOS devices to be just the trick that keeps my "to-dos" organized. You can make multiple lists, each with a different theme (i.e. personal, school, grad school, etc.). The best part is using iCloud the lists sync to all your devices and stay organized in the same folders/places! Don't get me wrong, I like writing things down with an old fashioned pencil and paper, but I have found this system to be the most efficient and productive way for me to keep track of all the things I need to get done.


 Let's start with Notes... This is where all the brainstorming can happen. Any ideas that you may write down on a post-it or a random piece of paper can go here. Then, after you have formulated your ideas for how you are going to attack this task, you can organize your thoughts into folders for different compartments of your life (i.e. School, Personal, TpT, Blogging, etc.)


  1. Link your different email accounts to your Notes. For example, I have my blogging, my personal, and my school emails all on the notes app with different folders for each.
  2. Create folders for each compartment of your life. In the folders you can have multiple lists that pertain to that category.
  3. Photos & Videos, Sketches, Maps, Websites, Audio, and Documents can now be used in Notes. 
  4. The Checklist feature allows you to make an easy to-do list. I have not used this much yet, but I foresee using it for lists with extensive or detailed tasks that need pictures, document attachments, etc. 

  5. Photos are a good visual. Have an idea from Pinterest you want to turn into a task? Instead of trying to describe the abstract that, take a screenshot (or just save the image) and throw it in your notes! 
With the latest Apple software update, El Capitan, you can now organize your Notes so much more efficiently with folders and the option to add pictures, videos and other media!

Here is the checklist feature! Also shown is the ability to add documents, entire photo albums, and more!


In my School notes, I have a folder for ideas things I want to do next school year, 2016-17. I already have a few different kinds of lists started. In the list "Room Setup/Organization," I dragged a screenshot of this idea I pinned that I want to use next year for organizing my files.


  1. You can set a due date or a reminder on your device to let you know when it needs to be finished by and/or remind you about it.There is also a "priority" feature that allows you to mark certain items on your list with one of three priority levels... or none at all! 
  2. Share your reminders with family/friends! If there are multiple people in your household, make a shared groceries list so that anyone can add what they need to from their phone or while at work. If you have to wait until you get home to write it down on that magnetic pad of paper on the fridge, you'll probably forget. 
  3. You can add supplementary notes to each item so that detail can be visible in a faded color below. 
  4. Once you have completed a task, simply click on the bullet beside the text to make it disappear! In case you want to feel accomplished, which I find encouraging to keep you positive about your productivity, you can click to show  your completed tasks to see all you have finished! 
  5. Another awesome part is the "Scheduled" section at the top that takes any task with a due date on all of your lists and places them into a dated list. It also keeps them color coded by the list each task originated from.

Using iCloud for your reminders is helpful in that you can access your to-do list on the go and on any device!
Set your priority, choose a location, and choose a day you want your device to automatically remind you.


How do you organize your lists and to-do tasks? I am always interested in learning other teachers' systems and organizational techniques!

Monday, November 16, 2015

Why Smore is the best place for your classroom newsletters


What do you use for your classroom newsletters? I used to stress about making mine as cute and original as possible, often having an entirely different theme each week/month. Now I have found that the convenience (and tech-savvy features) of a new website called Smore have overcome my desire for original design. Plus, the templates provided are really easy, the background designs provided and consistently updated are beautiful, and I can even add my own custom background should I feel so empowered. So without further ado, 5 reasons why Smore is amazing:

  1. The interactive features are reason enough to convert. You can embed links, events, and even forms for parents to view and utilize right in the newsletter. Take this chance to offer volunteer opportunities through a google form, or have parents RSVP to a class party through an event. My link to my class webpage remains on the newsletter for parents to always have access to. I plan on putting other important links on my future newsletters, like the 1:1 iPad webpage for our school, which provides troubleshooting advice, login information and much more. 
  2. You can view the newsletter statistics, like how many views and where it was viewed. You can even track how long people were viewing the newsletter for. So cool! 
  3. It stores your "flyers" (that's what they call them) so you have one easy and safe spot to view your newsletter history.
  4. SUPER easy to edit. I mean SUPER EASY. It forces me to forget about the cute fonts and clipart and focus on the content. 
  5. Mobile friendly. That's right, there's a mobile format so that parents can view right from their phones. There's no opening attachments on the computer or having to use a web browser. When I send my "flyer" out to my automated mailing list that stays stored in Smore, parents can immediately pull it up right in their email without the hassle of loading or multiple steps of access.


Okay, so I love Smore, and you should, too. Start off for free with 5 complimentary flyers. If you like it, join! For educators, it's $59/year. I bit the bullet because I just loved it so! You can even earn badges based on how successful your flyers are with their viewing audience. Did I mention I love Smore? 

What do you use for your classroom newsletters?


Saturday, November 14, 2015

Using Google Drive for Classroom Data in 5 Easy Steps


I don't know about you, but... wait, yes I do.... report card time is the busiest in all our lives as teachers.  Have I given all the assessments I need and has every student been assessed? How am I going to keep track of my assessment scores and what will be the criteria for report card marks? This is a bittersweet feeling of some serious anxiety and some butterflies-flapping-in-stomach anticipation for all of the fun organization to be had! (Serious dorkery, I'll be honest).

So to no surprise, I found technology to be the answer to all my report card needs. Since our job has teachers has basically turned into data managers, Google Drive is a must. In this post, I'm going to be discussing how I use "The Drive" (most specifically, Google Sheets) to keep track of all my kindergarten data! :)

Ready, here we go:
1. Template Structure: Using Google Sheets, make a template of what an individual student report card looks like:
Individual Report Card Template
I can't stress enough the importance of a TEMPLATE first. Don't start inputting data for an individual student- You need to have a complete blank copy that you can make copies of for each student. 

  • Column A has the skills listed in order the appear on the report card by subject area. 
  • Column B has the assessments used for each skill (Some of the assessments I made as a link, so that clicking on it will take you to the assessment. This is especially helpful if the template is shared with your teammates! You all know you are using the same assessment and you can all access it in the same place- I can't tell you how many times my team has found that we have several different versions of assessments in our binders!)
  • Columns C, D, and E are for each trimester of the year. Obviously you can change this so that it is for your own school's grading periods (semesters, quarters, etc.)
  • I made solid black rows in between each subject area set of skills so that it was visually easy to see. All you have to do is highlight the cells in the row and change the fill color to black.
3. Data Validation: This is the coolest part-- drop down menus! Click on the cell(s) that you would like to have drop down options for. Go to "Data" and then "Validation"
Data Validation


  • Go to "Criteria" and choose the type of criteria you would like to have for your data. I chose "List of Items" to have a drop-down menu. This works best when there are only a few options for what the student could have scored or if it is a developmental/diagnostic stage. Then, in the box, I typed all the different options I wanted to be included in the drop-down menu separated by a comma. 
  • If invalid data is attempted in the cell (for example, you accidentally type a number in the cell as you are recording student data), you have the option of the technology to either show a pop-up warning that it is not one of the data criteria you chose, or it can simply reject the input altogether (not allowing whatever it is you typed in the cell to appear).
  • Press Save. You will know it's worked when you see a little arrow in the cell. Clicking on the arrow, you will find your drop down menu and the options you have to choose.

Drop Down Menu For Data Criteria
4. Conditional Formatting: Our report card only has three possible marks ("Beginning," "Developing," "Secure). I color coded the spreadsheet so that red data= beginning, yellow data=developing, and green data=secure. Conditional Formatting is where you can format the cell(s) to automatically appear a certain way based on conditional rules you have created. After selecting the cell(s) you want with formatting rules, go to the Format menu and select Conditional Formatting.
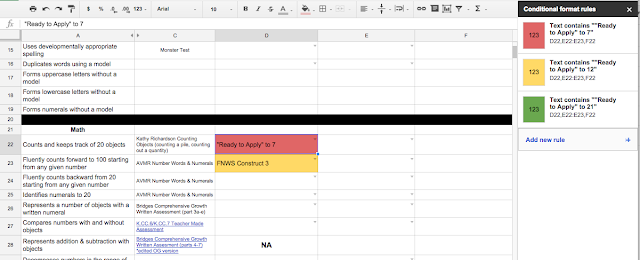
Conditional Formatting Rules


  • A menu on the right side will appear. As you can see, I have my red, yellow, green (beginning, developing, secure) formatting rules. This particular skill has a drop down menu with text that are developmental stages, so I made the rules based on the text contained in the cell
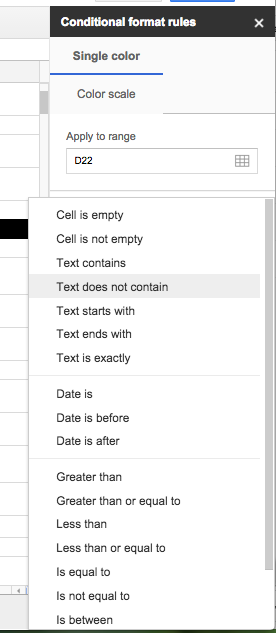
Choose the type of content the cell will format


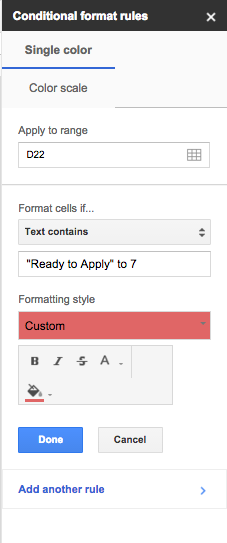
Choose the formatting style (color, bold, fill, etc.)
  • Add as many rules as you need to make each possible inputted score fall under each of the possible report card marks or grades. Just make sure the rules do not conflict with one another. 
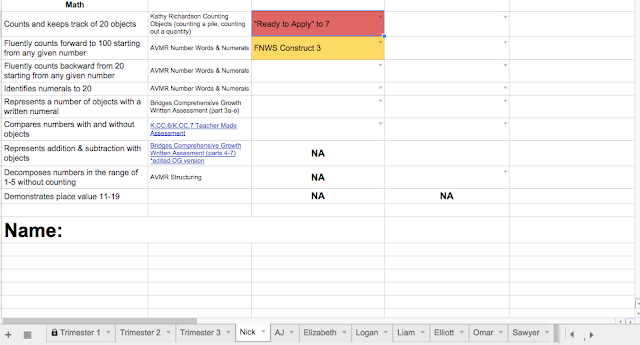
Each student has a tab with their own report card template
5.  Individual Student Tabs: Once the template for the individual report card is finished, it's time to duplicate the sheet for each student.
  • Clicking on the downward arrow on the tab at the bottom, select "duplicate." This will cause another tab to appear right beside the original with the exact same spreadsheet. You will need to do this for each student and you will want to have at least one extra tab that remains blank in case you get more students.
  • For printing purposes, I usually include a space in the template for the student's name on the actual spreadsheet.


Now it's time to start inputting assessment scores! Looking at your completed color-coded spreadsheets will make it so much easier to visually see how each student is doing and what assessments they may have missed and need to make up. I can fill out report cards lickety-split simply by looking at color! Simultaneously, I can see the scores for more detail about the student's performance, which I can use in report card comments or parent-teacher conferences! 
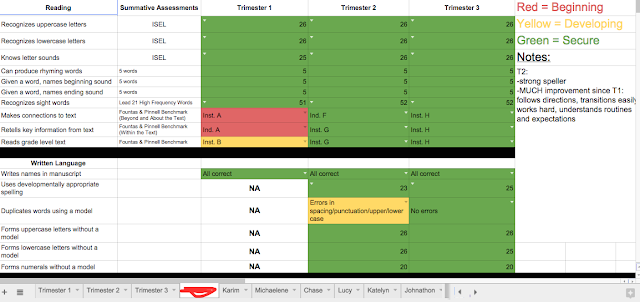
Here is an example of a student report card from last year
Print out for easily filling out report cards, or keep on the computer to glance at during conferences! Enjoy! 

How do you keep all your grades organized??? I'd LOVE (no seriously, I'm obsessed with this kind of stuff) to know!

Thanks for stopping by! :) :)


Want to see how I then have this data automatically transposed into a spreadsheet by class view per trimester? Comment below and I will be sure to add another post!
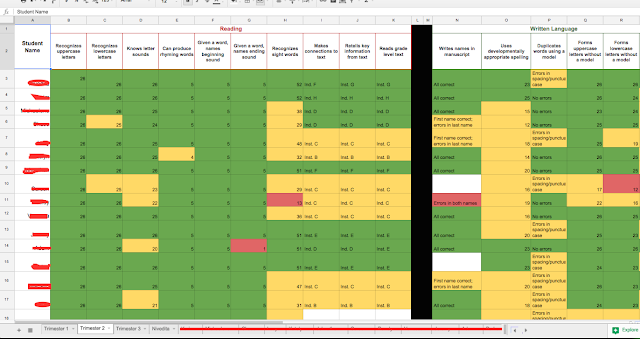
Student Assessment Data (Class View)

Thursday, June 18, 2015

Makeover Madness

I decided to participate in the "Tpt Seller Challenge" as a way to boost up my store this summer. I love the idea of Makeover Madness for TpT sellers! I haven't been on TpT for very long, but with all the new fonts, clipart and graphics I am constantly acquiring, I already have a product I could "make over!" Check out my updated Lesson Planner below :)


Sunday, April 12, 2015

Inquiry Journal!

Click on the picture to download this product from my TpT Store


I've been wanting to make an Inquiry Journal for some time now for when we complete our class inquiry projects. Having a journal to outline all the steps of the inquiry process helps me and the kids identify where we are and where we need to be. They can see how the project works at the very beginning- and as we all know, kids work much better when they know the schedule, the next steps, and the expectations. I am going to be using the journal this week, so check back for updates on how it's going in my classroom!

Sunday, March 22, 2015

Inquiry

We did a class inquiry project last week in all of Kindergarten. I know that some teachers, especially primary ones, may be resistant to the idea of "inquiry" and its abstract nature, however, starting off with a simple topic like the one we chose made it a lot easier. We are fortunate to have 1:1 iPad minis in our classrooms. They serve as a great tool for projects like these that require recording observations and collecting research, but maybe most importantly for creating a presentation to show what we learned. The topic we chose for our first inquiry project was "favorite color." I posed the question, "What is the favorite color in our class?" (because what kindergartener can't get behind that?) and the students took videos of themselves recording their "conjectures," or predictions. Then, when I asked them how we could figure out the answer to this question, they suggested ideas for how to collect the data all on their own. We took a survey of the class and tallied the answers. Students then revised their conjectures with another video recording. At the end of the project, students produced conclusions of what they learned. For example, there were an equal amount of people that liked yellow and orange, or, more girls liked green than boys. All of the steps of this process were put into a digital book in the Book Creator app. Find out more about Book Creator in the "Make it Tech-y" tab of my blog. I love seeing all of the amazing things Kindergarten teachers can do with inquiry in their classrooms. I knew that I needed to start off simple, but my hope is to build this practice onto bigger and better topics!


Tuesday, March 17, 2015

I Have, Who Has?


I love using this game, "I Have, Who Has?" to practice sight word recognition! It involves the whole class, requires every student to be listening carefully and makes it a fun, interactive way to learn their required sight words! What are some ways you practice sight words?

"I Have, Who Has?"